Wha-...what's that noise? It's coming from the direction of your yarn stash. Tiny screechy voices are calling out to you.
Use us up! We're taking up space! You should feel guilty, GUILTY! That's right, it's an attack of the scraps! All of those half skeins and little piles are coming to get you.
Never fear, for all is not lost. I have a few projects to share that help tackle the scraps. Note that I am not talking about small clippings of yarn, which can be used to stuff amigurumi, but the yarn balls that are too big to toss out and too small to use in a substantial project. Each of the following projects can be hooked up in a single sitting.
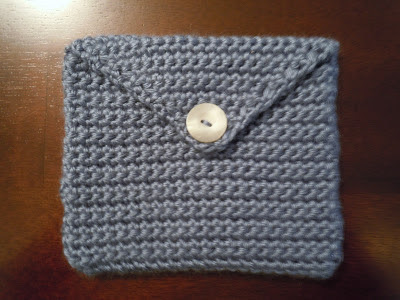
This small pouch can be made in almost any size. Whip up a flat piece of single crochet fabric, folding it in half every now and then to see how big you want your pouch to be. When your work is the desired size, decrease on both sides until you are almost at a point. Make a button hole by chaining across 2 to 4 stitches in the center of the row depending on the size of the button you want to use. Skip an equal number of stitches before finishing out that row. Voila! A simple horizontal button hole. Decrease until there are no stitches left and fasten off. Fold the fabric until it reaches the beginning of the decreasing rows and sew up each side with a yarn needle, working from the left bottom corner and wrapping around the edge of the flap until you reach the remaining side, then sew that side together. Turn the whole thing inside out. Sew a button to the body of the pouch under and just a tad bit lower than the button hole, and you're golden.

Want a different kind of scrap pouch? Here's a round one. Single crochet in a spiral round, following the normal increase pattern, without chaining or turning until the base is the size that you want. By the way, if you are new to crochet or you need help with a term or technique that I mention, drop me a line in the comments! I would love to make a tutorial for you. In the meantime, a number of great tutorials can be found on YouTube and the like. Explore the web and you'll find some really great stuff!

Back to the pouch. With the base done, chain three and turn. Work one dc into each stitch around, slip stitch into the top of the turning chain, ch 3 and turn. Continue adding rows of double crochet until your pouch is about one inch shy of your desired height. Work one row as follows: Chain 4, skip 1 dc, 1 dc in next dc, ch 1, skip 1 dc, 1 dc in next dc, and so on until you come all of the way around. Now finish by doing two more rows of double crochet, making sure to stitch a single dc into each dc or ch, and then fasten off. Cut a length of ribbon in a complimentary color and weave it in and out of the double crochet posts of the third to last row. Cinch your bag shut with a bow. You're done! Now you have a place to keep all of the sedatives you no longer need because your scrap panic has subsided.
If those projects were too much of an investment for you, here's a third project that should do the trick. It works especially well with bulky yarn but could also be made with multiple strands of yarn worked together or by using a hook that is one size too small for the yarn.
This bowl is made by doing half double crochet in the round with the normal increases, turning, and chaining. Continue until the base is as wide as you want it to be, then switch to single crochet and stop increasing, turning, and chaining. Just single crochet around until you run out of yarn or your bowl is the size that you want it to be. That's it! Do make sure that your stitches are tight so that your bowl has good structural integrity. I find that these scrap projects make great last minute additions to birthday gifts.


 Back to the pouch. With the base done, chain three and turn. Work one dc into each stitch around, slip stitch into the top of the turning chain, ch 3 and turn. Continue adding rows of double crochet until your pouch is about one inch shy of your desired height. Work one row as follows: Chain 4, skip 1 dc, 1 dc in next dc, ch 1, skip 1 dc, 1 dc in next dc, and so on until you come all of the way around. Now finish by doing two more rows of double crochet, making sure to stitch a single dc into each dc or ch, and then fasten off. Cut a length of ribbon in a complimentary color and weave it in and out of the double crochet posts of the third to last row. Cinch your bag shut with a bow. You're done! Now you have a place to keep all of the sedatives you no longer need because your scrap panic has subsided.

No comments:
Post a Comment
Please share! Note that due to spam moderation there is a delay in comment posting.